Naked Internship Part 2: How we built TodoWhat
Part 2 of a series exposing what it’s like to be an intern engineer at a tech consultancy. In this post I describe how my internship project was structured and some of the technology that was used.
Planning
“User stories” are used as a starting point to plan development of the application. They are concise sentences summarizing the who, what and why associated with features to be implemented. For example: As a user (who), I want to create a todo (what), so that I can remember things (why).
Each user story is followed by a set of “Acceptance Criteria”, a list of requirements laid out by the product owner that must be reached. These usually serve as further higher level clarification of what is desired of the feature. For example, these are the acceptance criteria coupled with the user story given above:
- go to the app
- user is presented with a blank text field
- user enters todo text in field
- user clicks create
- todo appears at the top of the todo list
- text disappears from text field
These are helpful to use as a launchpad for more detailed technical planning.
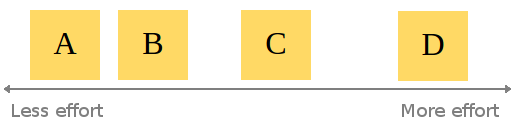
After establishing the user stories and fleshing them out with some acceptance criteria, we try and estimate the relative effort needed to bring each story to life using a technique sometimes known as ‘affinity estimation’. Here’s the gist of how we do this: First, setup a clear space on a wall/board. The left side of the board indicates less effort, the right side indicates more effort. The user stories are written down on Post-it notes, then one at a time a team member places the next user story onto the wall/board in a position they feel is appropriate relative to the other stories. Note that no points are assigned to the stories yet, they are simply ranked relative to each other.
Example configuration after all stories have been put up:
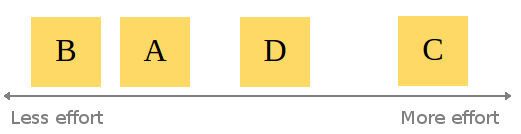
When all the stories have been put up on the board, a team member may choose to switch the position of a story if they disagree with the effort estimation so far. This continues until an equilibrium has been reached.
Example configuration after stories rearranged:
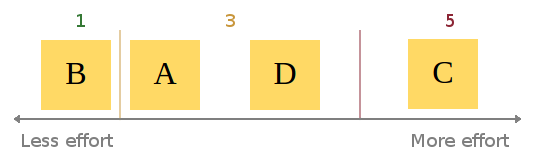
When this consesus is reached, assignment of story points begins. Be aware that given the abstract and subjective nature of “effort”, it can be hard to weigh up a user story in terms of points. At Atchai, we use the Fibonacci sequence as a scale. This means a story requiring very little effort would be a 1. Next level up is 2, then 3, then 5 etc. I find this system effective as it still promotes the idea of relative sizing. Let me explain: Using a completely linear scale could lead to lots of wasted time hunting for precision in our estimates. Using the Fibonnaci scale to estimate allows for only 5 members within the set containing integers between 1 and 10, i.e. F = {1, 2, 3, 5, 8}. A linear 1 to 10 scale has (obviously) 10, L = {1, 2, 3, 4, 5, 6, 7, 8, 9, 10}. Using the linear scale doubles the choices you can take for classifying stories. For example, say story D was agreed to be worth 3 points. Story C is agreed to take roughly twice the effort of story D. Using a Fibonacci scale, we can (probably) quickly say that story C will probably be a 5 (2*3 closer to 5 than 8). Trying to estimate the same ticket using the numbers 1 to 10 could lead to a big discussion of whether it should be a 6 exactly, or maybe a 5 or 7 instead.
Example assignment of points:
tl;dr: less choice = broader estimation categories = easier to agree on effort categories = less time wasted
Once the stories have all been estimated, they get chucked into the product Backlog and are ordered by priority. From here, user stories are picked and put into the Sprint Backlog based on priority and estimated points. At this stage it is clear to see the value of estimating the stories. Without doing so, the team could easily overcommit themselves, trying to achieve too much in one sprint, optimistically underestimating the amount of work needed.
Developing
With the planning out of the way, it’s time to start developing!
Sprint overview
We use a Kanban board to visually keep track of progress during each sprint (a week long iteration of developing). When I’m ready to start working on a ticket, it’s taken from the top of the backlog and put into the development column. When I’m finished working on the ticket, it goes into the code review column. My code gets reviewed to ensure it’s production ready. If it isn’t, any problems are highlighted and the ticket gets put back on the backlog. If it is, the ticket goes into the testing column. Here the ticket is tested to check it passes the acceptance criteria and no bugs are present. It is only after a ticket passes code review and testing that it is considered truly done.
Technical Details
Front End
For this app, we started by building up most of the front end/UI before implementing the back end as it was required.
The front end was built using Backbone.js as well as Bootstrap to help with the layout/styling.
HTML5 brings with it localStorage, allowing for data persistance in web apps without the need of a back end. This was really useful to begin building a front end prototype, as the data models would persist and still be there if you refreshed the page. I made use of this via Backbone.localStorage.
We also wanted to ability to rearrange the order of todos in the list. The sortable interaction from the jQuery UI library was used in order to achieve this. A significant problem with this was there is no support for touch screen devices. Luckily jQuery UI Touch Punch enabled support almost perfectly, with minimal fiddling.
Testing
Eventually, an attempt to implement a new feature, broke an existing one. Sometimes I would not realise this until quite a while later, making it difficult to track down exactly what change caused the regression. This is where unit testing steps in. The aim of unit testing is essentially (as the name suggests) to test small modules or units of code to ensure they are outputting what is expected. For example, one of my tests is simply making sure it is possible to add a todo, and that the content of the todo is what it was created with at the start. There are many testing frameworks to choose from for javascript. The one we settled on for this project was Jasmine. Jasmine lets you write your tests in a very natural intuitive way. Here’s the snippet for the test described above:
describe("the todo", function(){

  beforeEach(function(){
    this.todo = new Todo({
      content: "A test todo"
    });
  });

  it("should have content", function(){
    expect(this.todo.get("content")).toBe("A test todo");
  });
}
Hopefully it’s clear right off the bat what is happening by just reading the code. We simply describe what we’re testing, “the todo”, and what it should be tested for. It’s almost readable as plain English! The todo should have content which we expect to be “A test todo”.
At this point, you still have to remember to run your tests! Let’s take this a step further.
Continuous integration
Enter Travis. Travis is a continuous integration platform that allows you to automate your builds every time you do a git commit. You can specify exactly what it should do in a hidden file named .travis.yml. After hooking up a git repository, Travis listens for a commit. When it hears one, your build is automatically built and tested.

In the event of a failed build, Travis can email you to let you know (or even integrate into chat tools like Flowdock or Hipchat). Now anytime I commit a change which causes a regression, I’m aware of it almost instantly and can take appropriate meaures to fix it.
Build tools
As the project grew in size, code grew messier. More and more javascript files needed to be pulled into my HTML. I had about a dozen <script> tags, loading up all the required libraries, my backbone scripts as well as template scripts. This might be fine if you were only ever running the app locally, or if you like messy HTML. In reality if the app was deployed like this, the abundance of <script> tags could have a big impact on loading time. Web browsers exhibit behaviour called synchronous blocking. When the browser comes across a external <script> tag, it starts downloading the script file, and stops everything else it was doing until the javascript has been loaded and interpreted. This means that including scripts before any DOM elements will stop the browser from rendering the elements until it’s finished fetching and reading the javascript.
Having a dozen scripts in the <head> prevents any of the page from loading. Problematic. A simple solution might be to just translate the <script> tags down to the end of the <body> tag. In this case, the browser would render all the DOM elements before seeing that there is included javascript it needs to fetch.
However, this solution would not really work in an application such as this. Much of the content to be displayed to the user is dynamically generated by the Backbone views using data from the Backbone models. Although any DOM elements explicitly written in the HTML file will not be blocked from rendering, the user would still have to wait until for all the javascript to be loaded before seeing their todos.
Browserify can help with this. Using Browserify allows me to require my javascript files in other javascript files like modules, node.js style. I specify a entry point file in my source code and when I’m done coding, browserify starts from the entry file, figures out all the required module dependecies, then bundles up all of the javascript into a single file. This is then the only file I need to include in my HTML. I no longer have to worry about blocking DOM rendering, too many requests, or even the order in which I include my javascript files in my HTML.
Although serving up the concatenated file from Browserify is fine for a public deployment, all the individual files should still be available in the version control repository for other developers to code review and collaborate. This also means that I had to include all the external javascript libraries in the repository. A better way to approach this is to use the Node.js package manager (npm). In a file name package.json, I simply specify what library/module I want as well as the version, run the npm install command and all the javascript depencies get downloaded into a node_modules directory. Now only the package.json file has to be included in my repository.
There was still a small kink which would slow down my development. Every time I made a change to a source file, I would have to tell Browserify to bundle up my files again before I could see the change. Each time this happened, Browserify would have to read through every source file and recompile. Using watchify alleviates this, by watching for a change in all your source files, and recompiling the changes to the bundle when it sees one.
Using gulp in conjunction with this streamlines the process even further. Gulp is a build tools that allows you to define certain repetitive tasks you may need to do during development in a gulpfile.js. Here is my gulp task for watching and recompiling my source files (browserifySetup helper function not shown).
gulp.task('watch', function(){
    watch = true;
  browserifySetup('./todowhat/static/js/app.js', 'bundle.js', './todowhat/static/');
});
Now I can just run gulp watch to watchify my files. Since the path to my starting source file is written into the gulp task, I don’t have to type it out every time, as when isssuing the browserify/watchify commands. Gulp truly shines as you begin to define more and more tasks. I have a task to compile my source files as well as minify them to be ready for deployment. I have a task to run my Jasmine tests, and even one to run tests every time there is a change!
Back End
The back end was built using Flask, a web “microframework”. On top of this, we used SQLAlchemy to communicate with the database in python.
The back end was only implemented as it was needed, namely to enable having different user accounts. I used Flask-Login to deal with user sessions. Flask-Login lets you restrict certain views to logged in users by simply adding a @login_required decorator.
Database
Analogues of the todo and tag models I first created in Backbone were written as SQLAlchemy models for the back end, as well as one for user accounts. More than one todo can have the same tag, and conversely more than one tag can have the same todo. This means there is a many-to-many relation between the todo and tag models, requiring a helper association table. Additionally there is a one-to-many relationship between users and todos, since a user can have many todos (but a todo cannot belong to different users). Here is a visual representation of the database tables:
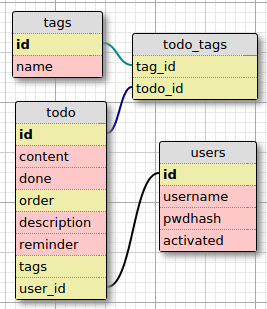
A nice side effect I found of having a many to many relationship between the tags and todos was the ability to use SQLAlchemy’s count() query to count the amount of todo models associated with a tag model (or vice versa).
Security
When writing any sort of application, especially a web based application, it is important to think about security. It is easy to unknowingly write applications with security flaws considering the multitude of attack vectors that exist. The Open Web Application Security Project (OWASP) aims to mitigate the creation of insecure software by making clear the top security flaws and how to prevent them. The most recent OWASP top 10 list is as follows:
- A1 Injection
- A2 Broken Authentication and Session Management
- A3 Cross-Site Scripting (XSS)
- A4 Insecure Direct Object References
- A5 Security Misconfiguration
- A6 Sensitive Data Exposure
- A7 Missing Function Level Access Control
- A8 Cross-Site Request Forgery (CSRF)
- A9 Using Components with Known Vulnerabilities
- A10 Unvalidated Redirects and Forwards
Given the common knowledge of the threats above, it is not suprising to see some of these problems have been mostly addressed when using open source development tools.
SQLAlchemy for example, takes SQL injection into account and sanitizes data for you, i.e. special characters (common in SQL commands) are automatically enclosed in quotes to prevent bad.
Cross-site scripting is a popular and relatively easy method of attack in which malicious code from the attacker is executed on a clients machine when visiting a vulnerable website. This usually occurs when artribrary HTML, including javascript within <script> tags can be inserted and run on the client, for example via user input. The Jinja2 templating language automatically escapes HTML to prevent cross-site scripting.
Another attack worth mentioning is the man-in-the middle attack, where an attacker intercepts the traffic between client and server before sending it on. The attacker acts as a proxy between the two nodes. They are able to read data sent from the server to client and vice versa, as well as modify the data before sending it off again. This can be prevented by using HTTPS where certificates are used to validate the authenticity of the server. Note this does not stop MITM attacks from being possible; the attacker can still intercept HTTPS traffic by opening SSL connections with the client and server. However the certificate will not be valid, and the user will usually be warned of this by the browser. (This doesn’t stop feds though)
In building an application featuring user accounts, it becomes necessary to store user account information in your database. It is never a good idea to just store the users password in plaintext. If an attacker with malicious intent gained access, they would be able to literally read the stored passwords. Cryptographic hash functions offer a slightly more secure way of storing user passwords. An expanded discussion of this can be found in this blog post.
Knowledge of common security vulnerabilites and pitfalls is not always enough. Developers are only human after all, and are prone to human error. They may forget to account for certain vulnerabilities and expose the application to attackers. For this reason, regular code reviews between team members is extremely important; the reviewer may pick up on unaccounted security flaws. Secure code should be a subset of production quality code.
API
I created a simple RESTful API in Flask to plug into the Backbone front end. The routes were written with Flask-Classy views.
This allows you to write all your views as classes, and routes as methods of the class. There are certain ‘special’ methods which will automatically have their routes generated by Flask-Classy. You don’t even need to set the allowed HTTP methods yourself.
Example:
from flask.ext.classy import

  class APIView(FlaskView):
      def index(self):
          # Sends a GET request to '/api'
      def get(self, id):
          # Sends a GET request to '/api/<id>'
      def post(self, id):
          # Sends a POST request to '/api/<id>'
To reduce the amount of bot signups, we added email confirmation, requiring users to activate their accounts before logging in. Each user object in the database table has an activated boolean attribute, which is set to false by default. When a user registered for the site, a unique activation URL is generated and sent to them by email. When the user clicks the link, activated is set to true and the user is allowed to log in. Activation links are generated with the URLSafeSerializer method from the ItsDangerous module as outlined in this snippet. Emails are handled with Flask-Mail, using Mandrill’s SMTP server.
Deployment
We deployed the TodoWhat app using Heroku. Heroku is a ‘Platform as a Service’. It let’s you just push your app using git, and takes care of all the infrastructure for you. After I’ve committed a changed, I just say git push heroku master and heroku will automatically detect what (programming) language my app is in, install any required dependecies and deploy my application. Commands that you want heroku to run are defined as processes in a Procfile file. At the very least, a web process should be given to tell Heroku how to start the server. For reference, here’s mine: web: gunicorn app:app
The python dependecies (i.e. Flask etc.) must be listed in a file called requirements.txt. Be aware if you’re building a Flask + Backbone app that having package.json in the root directory as well will cause heroku to think your application is just a node.js application, and will not install the python dependecies. This is because Heroku searches for Node.js before Python, and uses the first match found to compile your application. This is easily avoided by making use of .slugignore, a file similar to .gitignore. Any files listed in here will be ignored. In the root of your project directory:
echo "package.json" > .slugignore
Alternatively, you can set a custom buildpack for Heroku to use
heroku config:set BUILDPACK_URL=https://github.com/heroku/heroku-buildpack-python
Heroku has a variety of ‘addons’ you can attach to your app. For TodoWhat, we use the PostgreSQL addon to provide a database, and the Mandrill addon for email delivery.
Once you’ve deployed your app to Heroku, just access it from <app-name>.herukoapp.com (or you can set up a custom domain name) and you’re done!