
Naked Internship Part 2: How we built TodoWhat
Part 2 of a series exposing what it's like to be an intern engineer at a tech consultancy. In this post I describe how my internship project was structured and some of the technology that was used.
# Planning
"User stories" are used as a starting point to plan development of the application. They are concise sentences summarizing the who, what and why associated with features to be implemented. For example: As a user (*who*), I want to create a todo (*what*), so that I can remember things (*why*).
Each user story is followed by a set of "Acceptance Criteria", a list of requirements laid out by the product owner that must be reached. These usually serve as further higher level clarification of what is desired of the feature. For example, these are the acceptance criteria coupled with the user story given above:
- go to the app
- user is presented with a blank text field
- user enters todo text in field
- user clicks create
- todo appears at the top of the todo list
- text disappears from text field
These are helpful to use as a launchpad for more detailed technical planning.
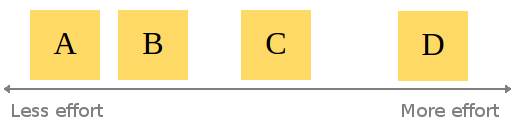
After establishing the user stories and fleshing them out with some acceptance criteria, we try and estimate the relative effort needed to bring each story to life using a technique sometimes known as 'affinity estimation'. Here's the gist of how we do this: First, setup a clear space on a wall/board. The left side of the board indicates less effort, the right side indicates more effort. The user stories are written down on Post-it notes, then one at a time a team member places the next user story onto the wall/board in a position they feel is appropriate relative to the other stories. Note that no points are assigned to the stories yet, they are simply ranked relative to each other.
*Example configuration after all stories have been put up:*
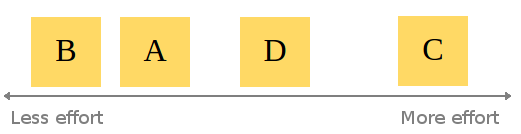
When all the stories have been put up on the board, a team member may choose to switch the position of a story if they disagree with the effort estimation so far. This continues until an equilibrium has been reached.
*Example configuration after stories rearranged:*
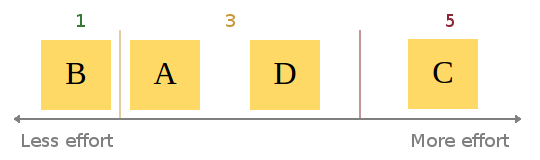
When this consesus is reached, assignment of story points begins. Be aware that given the abstract and subjective nature of "effort", it can be hard to weigh up a user story in terms of points. At Atchai, we use the Fibonacci sequence as a scale. This means a story requiring very little effort would be a 1. Next level up is 2, then 3, then 5 etc. I find this system effective as it still promotes the idea of relative sizing. Let me explain: Using a completely linear scale could lead to lots of wasted time hunting for precision in our estimates. Using the Fibonnaci scale to estimate allows for only 5 members within the set containing integers between 1 and 10, i.e. *F = {1, 2, 3, 5, 8}*. A linear 1 to 10 scale has (obviously) 10, *L = {1, 2, 3, 4, 5, 6, 7, 8, 9, 10}*. Using the linear scale doubles the choices you can take for classifying stories. For example, say story D was agreed to be worth 3 points. Story C is agreed to take roughly twice the effort of story D. Using a Fibonacci scale, we can (probably) quickly say that story C will probably be a 5 (2*3 closer to 5 than 8). Trying to estimate the same ticket using the numbers 1 to 10 could lead to a big discussion of whether it should be a 6 exactly, or maybe a 5 or 7 instead.
*Example assignment of points:*
tl;dr: less choice = broader estimation categories = easier to agree on effort categories = less time wasted
Once the stories have all been estimated, they get chucked into the product Backlog and are ordered by priority. From here, user stories are picked and put into the Sprint Backlog based on priority and estimated points. At this stage it is clear to see the value of estimating the stories. Without doing so, the team could easily overcommit themselves, trying to achieve too much in one sprint, optimistically underestimating the amount of work needed.
# Developing
With the planning out of the way, it's time to start developing!
Sprint overview
We use a Kanban board to visually keep track of progress during each sprint (a week long iteration of developing). When I'm ready to start working on a ticket, it's taken from the top of the backlog and put into the development column. When I'm finished working on the ticket, it goes into the code review column. My code gets reviewed to ensure it's production ready. If it isn't, any problems are highlighted and the ticket gets put back on the backlog. If it is, the ticket goes into the testing column. Here the ticket is tested to check it passes the acceptance criteria and no bugs are present. It is only after a ticket passes code review and testing that it is considered truly done.
Technical Details
Front End
For this app, we started by building up most of the front end/UI before implementing the back end as it was required.
The front end was built using Backbone.js as well as Bootstrap to help with the layout/styling.
HTML5 brings with it localStorage, allowing for data persistance in web apps without the need of a back end. This was really useful to begin building a front end prototype, as the data models would persist and still be there if you refreshed the page. I made use of this via Backbone.localStorage.
We also wanted to ability to rearrange the order of todos in the list. The sortable interaction from the jQuery UI library was used in order to achieve this. A significant problem with this was there is no support for touch screen devices. Luckily jQuery UI Touch Punch enabled support almost perfectly, with minimal fiddling.
Testing
Eventually, an attempt to implement a new feature, broke an existing one. Sometimes I would not realise this until quite a while later, making it difficult to track down exactly what change caused the regression. This is where unit testing steps in. The aim of unit testing is essentially (as the name suggests) to test small modules or units of code to ensure they are outputting what is expected. For example, one of my tests is simply making sure it is possible to add a todo, and that the content of the todo is what it was created with at the start. There are many testing frameworks to choose from for javascript. The one we settled on for this project was Jasmine. Jasmine lets you write your tests in a very natural intuitive way. Here's the snippet for the test described above:
describe("the todo", function(){
beforeEach(function(){ this.todo = new Todo({ content: "A test todo" }); });
it("should have content", function(){ expect(this.todo.get("content")).toBe("A test todo"); }); }
Hopefully it's clear right off the bat what is happening by just reading the code. We simply describe what we're testing, "the todo", and what it should be tested for. It's almost readable as plain English! The todo should have content which we expect to be "A test todo".
At this point, you still have to remember to run your tests! Let's take this a step further.
Continuous integration
Enter Travis. Travis is a continuous integration platform that allows you to automate your builds every time you do a git commit. You can specify exactly what it should do in a hidden file named .travis.yml. After hooking up a git repository, Travis listens for a commit. When it hears one, your build is automatically built and tested.
In the event of a failed build, Travis can email you to let you know (or even integrate into chat tools like Flowdock or Hipchat). Now anytime I commit a change which causes a regression, I'm aware of it almost instantly and can take appropriate meaures to fix it.
Build tools
As the project grew in size, code grew messier. More and more javascript files needed to be pulled into my HTML. I had about a dozen `